Tuesday, August 30, 2011

A Ruffled Hoodie, not Feather

Just the other day I was walking around Target, like I do almost daily, perusing the clearance rack in the baby clothes department. I stumbled upon this gem, an orange hoodie which seemed perfect because the chilly California nights are quickly approaching. Best part of the entire deal was the fact that this baby was going to be fifty percent off it's original price and ended up only costing me $2.25. But, the more I looked at it, the more it looked a little "boyish" to me. I hemmed and hawed over it for a while, but finally threw it in the cart fully knowing that something would pop into my mind. 

And a popping it did, or should I say a ruffling! 

I need to lead into my tutorial with this warning. I am not a pro sewer, nor have I been doing it a long while. In fact, the sewing bug just bit me a only a few weeks ago and now you can't keep me out of Joann Fabrics and Michaels or away from my machines! Thus, my terminology might be off, my skill level low, and my final product imperfect. However, I have fun sewing, what I make turns out usable and cute, and I think I'm getting better. So, if you looking for a tutorial that essentially tells you the simplest way to make your final product, then continue reading! 

Ruffled Girls Hoodie


After you have found your right hoodie, shirt, or other item that you want to ruffle, go ahead and pick a coordinating fabric. The types of fabric you choose do not need to be the same for both items. As you can see here, I chose a hoodie made from a jersey material, and a ruffle made from one hundred percent cotton. 


Next, we are going to lay our fabric out on a hard surface, measure the width you want your ruffle to be (remember to give yourself plenty of extra space for making a seam), and then you can simply cut a few inches and gently rip the fabric all the way down to the end. If you have never  ripped fabric before, you should give it a try. If you do not feel confident with ripping, then go ahead and cut your strip. I chose to rip my strips 3 inches wide, but it is totally up to you.


Once you have your two pieces of fabric, go ahead and fold over each side about 1/2 inch,  and sew up the seam. You want to make sure your sew machine is set on a straight stitch with a stitch length around 2 or 2 1/2.


When all seams have been sewn, we are going to gather. Gathering sounds hard, and you might even be intimidated. I know I was at first. But, it is very easy. You want to make sure you have your sew machine still set on a straight stitch with your stitch length set as long as possible (it is a 5 on my machine). You will stitch two straight parallel lines down the middle of your material leaving a few inches of lag thread on each end. 

Now, you must separate your threads. You should have two in the front and two in the back on each end. Take the two back strings on on end, and gently pull. The fabric will begin to ruffle up. You want to continue this process all the way until the ruffle is your desired length. Then, tie the front strings together and the back strings together on both sides of the ruffle. You can cut the excess thread when knots are in place. 

Pin your new ruffle right next to the zipper. You don't want it exactly on top of the zipper, because that will be hard to sew, and hard to zip. I used two pins on both ends of the ruffle in order to help it stay in place will stitching. Once you have it pinned, go ahead and sew a straight stitch, with a stitch length back around 2 1/2, straight down the middle of the two lines you used for gathering. Make sure you do a backwards/forwards on both ends to lock your ruffle in place. Repeat this step on the opposite side of the zipper with your second ruffle. 


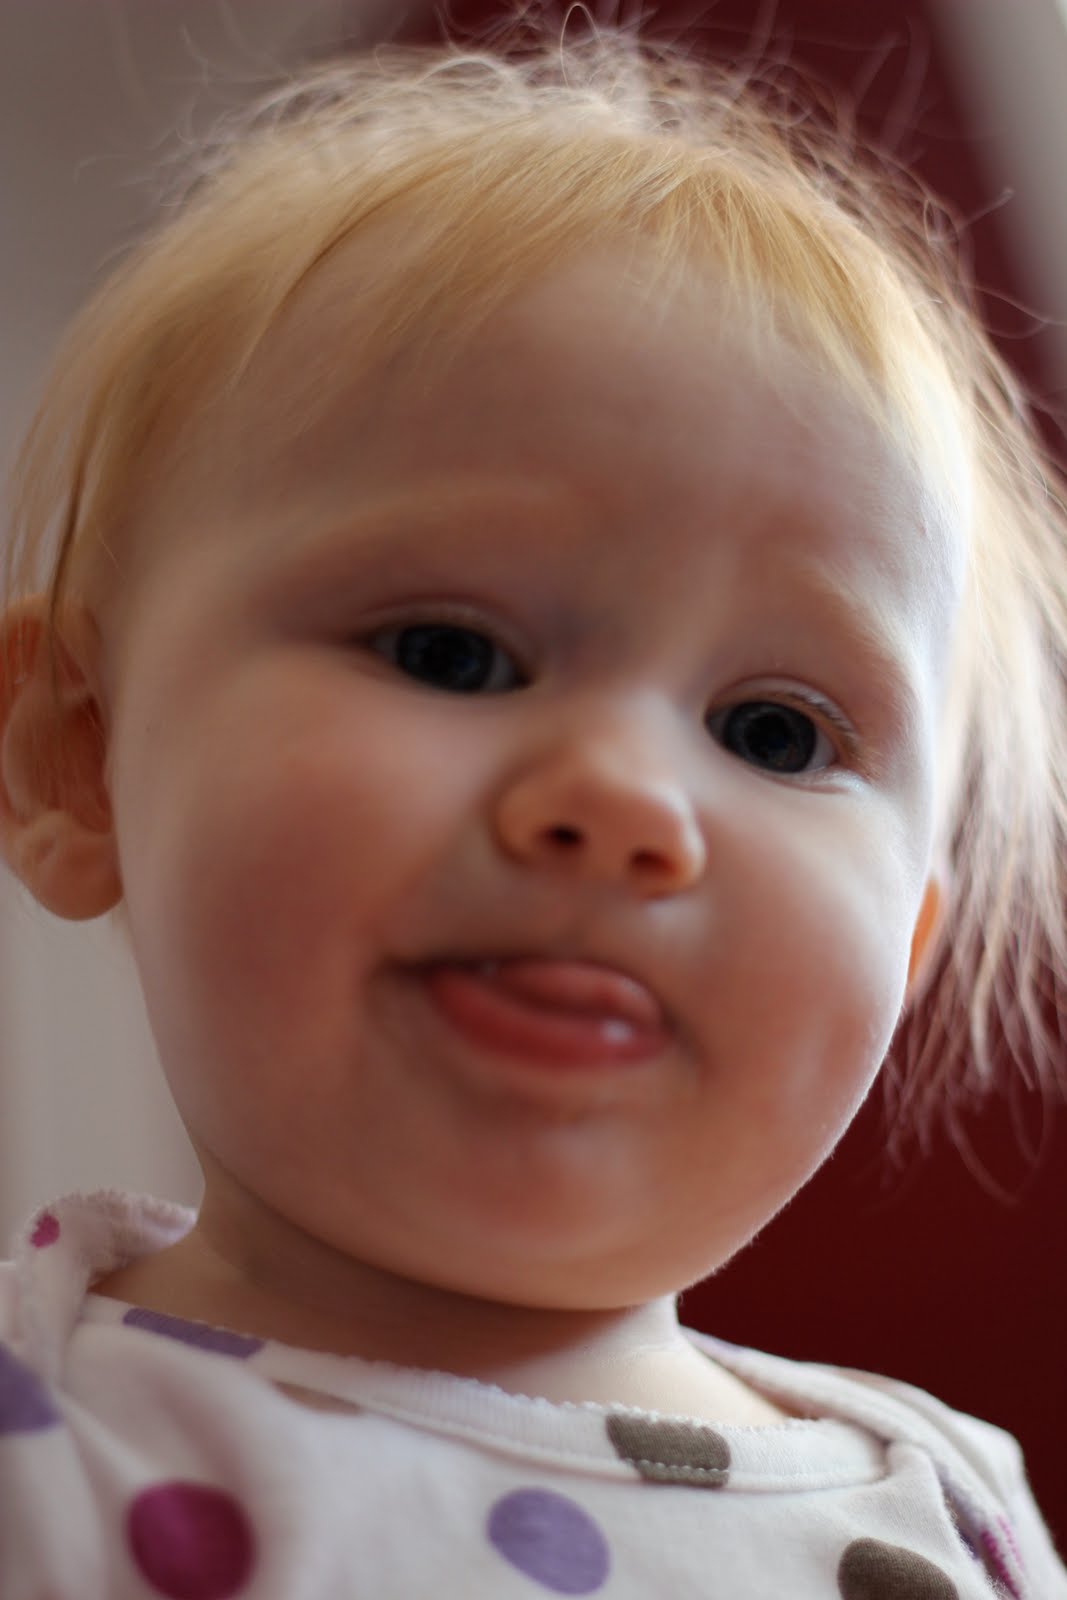
And...PRESTO! You have a new girly ruffled orange hoodie which looks absolutely adorable on my little Sweet Pea, if I do say so myself.

This little project should take an inexperienced seamstress, like me, about 30 to 45 minutes from start to finish. Remember to have fun, be creative, and share! 

Monday, August 29, 2011

Almost


No, your eyes aren't deceiving you! Presley pulled herself up to a stand & tried walking!! It's only a matter of time!


Taking Time

There are people, experiences, and places in our lives that we sometimes take for granted. Sadly, we only tend to take a second glance at these when the people are gone, after the event has taken place, or when change has already occurred. And, we tend to attribute our oversight to the overloaded schedules we quickly book up, the children we must nurture and raise, or our exhausting jobs which require our attention.  

Recently, I have been doing some thinking. Well, lets be honest...I've been doing A LOT of thinking. And, primarily all my thoughts come back to this one idea. I want to live my life not taking things for granted. And, I want to teach my girls that too. I want them to value the time they have on this earth,  to respect each person they encounter,  to learn from every experience whether good or bad, and to take time. 

Time to smell the roses. Time to look up at the clouds and use their imaginations. Time to wade in the coolness of the ocean water with sand squished between their toes. Time to watch the sun set beneath the horizon as the moon and stars magically appear above. Time to grow, learn, and make memories. 

Because, you see, its time that we take for granted the most. And, no matter what, we never seem to have enough of it. The last year or so have proven this for me. Between the normal everyday happenings in my life, I have experienced loss. The loss of two grandparents, as well as my unborn child (more to be explained in a different post). And, this loss has left some empty holes, which continue to be filled each day because I strive to take time, and to not take the things close to my heart for granted.

Like Thursday evening strolls on the shore of Huntington Beach with the hubster and our girls! 


Like little bare feet bouncing as I wear them on my chest!

Like the beauty of the California coastline on a cool summer night!


Like family time spent building sandcastles, posing for pictures, spinning around until dizziness sets in, crawling independently through the sand, and splashing with delight. 


Like beautiful faces full of joy, smiling, experiencing, and living life. 

Like tender moments in the setting sun holding our sweet girls. 


There is no doubt in my mind that the short time we spent at the beach, as a family, on Thursday night will forever be cemented in my heart. The squeals of delight from the girls, along with their ear to ear smiles were priceless. And, the warmth of their innocent hands in mine as we strolled along the beach together is a memory that will last a lifetime. 

As time passes, which it seems to do too quickly around here, I am sure things will be taken for granted. However, its important to me to have those moments be few and far between. Because, after all, time is something we all do not have enough of, but something we all need to take a little bit of. 


Always Thinking

If only I knew what she was thinking. 
In a few weeks she'll turn 3, but it seems like she
is wise beyond her years already! 

Sunday, August 28, 2011

Newest Addition

This is the newest addition of matching dresses I have made for the girls! However, I can't take all the credit! Daddy-O was up till 1 am with me using the serger to gather!


I feel so thankful that the girls and I have such an awesome daddy & hubby who takes interest in everything we do! We are very lucky!

Thursday, August 25, 2011

Sisters

They are our girls!
They love each other!
They are sisters! 
  

From Teething to Standing

Presley's teething like a mad woman. 
She is full of drool, snotty noses, and cranky faces. 


She is constantly chewing on herself or something else, and 
making ridiculously funny faces! 


And, she is pulling herself up to a stand on EVERYTHING.
The side of the bathtub, my leg, her toys, the kitchen table chairs,
shopping carts, and anything else she can find! 


Her First Boo Boo

It's sad to say, but Presley got her first bloody Boo Boo yesterday.

I'm not quite sure how it happened. She was crawling along the floor, 
a heard a little whimper, and then there was a puddle of blood. I
instantly picked her up, searched her entire body, but couldn't find where
it was coming from. So, I started asking G if she was cut somewhere. Nope. 
Sure enough, Presley's heal had a little gash on it. 


I hurried her into the bathroom,  ran water over it, dabbed some Neosporin
on it, and gave my baby her first Band-Aide. She is definitely a tough cookie, 
who hasn't whimpered since. 

Looking Through a Telescope of Imagination


Ever wonder what to do with plastic containers that food or other household items come in? Well, you have come to the right place, because I certainly do. For some reason I have trouble throwing them away. I usually hold them in my hand for a moment, try to think of a valid reason to keep them, and then either stash them away in cupboard to use another time, or reluctantly purge them. I wouldn't label myself as a "green" person by any measure considering that I drive a SUV and don't recycle as much as I should, nor would I say that I think much about the process that goes into making such an item and then disposing of it. It's just I like them. I think their cute. I want to keep them around, because I know that I can reinvent them somehow. 

Recently, I did just that. I, or should I say we, turned one of Presley's baby snack containers into a Telescope of Imagination. It was fun, it was simple, and it gave Giulietta and I a chance to turn our daily humdrum walk down the street into something different, something big, something exciting.

All we used to make the Telescope was one container, one sheet of felt, a few dabs of hot glue, a pair of scissors, one small piece of foam, and some other random art supplies from past projects that we had stuffed in the cabinet.


Once you have the perfect container and felt  picked out, you want to lay them both out on the table. Squeeze a line of glue along one edge of the felt, place the container on top of it, and roll. If you do not have felt, and do not want to make a trip to the store, simply use paper.


When you have reached the end, squeeze out another line of hot glue and tightly stretch the felt around the container.


Give the little fingers the big scissors, and allow them to cut the excess fabric around the top of the container. When they have finished, go ahead and trim it up for them like so.


Cut a circular hole in the bottom of the container. Apparently Gerber makes their containers with some heavy duty plastic, so it required me using a knife, not scissors like I had originally planned, in order to cut my hole. Whatever you do, make sure the kidlet is a safe distance away when making your cuts.


Next, take your piece of foam (or paper), fold it in half, cut a half circle in the middle, and allow the kidlet to glue it to the top of the container using hot glue.

Cut the excess foam off , and the Telescope is complete! Well...at least as far as the building goes. 


Now it's time to let the decorating begin!

And...boy did she decorate. Giulietta's weird fascination with the jiggly eyeballs totally cracked me up. She wanted them everywhere. In fact, I had to suggest she use the other materials to decorate, and thankfully she willingly did, otherwise I think we would have ended up with a telescope full of jiggly eyes. 

With the telescope now complete, it was time for us to put it to the test. It was time to look through a telescope of imagination as we walked. 


A walking we went. The path we took, was the same old one down to the corner which we had down hundreds of times since we was born. But, this time it was different. It was brilliant. It was magical. Maybe it was the imagination that was triggered by the new homemade telescope which added to the atmosphere, or the warm summer sun quietly setting below the palm trees. Perhaps, it was the fact that it was just the two of us exploring, laughing, talking, discovering new things about each other, and growing closer together. 


As the summer winds down and the days get shorter, I am reminded of how the time I have with my girls is much the same. As tiny fingers turn into little fingers, and littler fingers turn into big fingers, the sweet giggles, tender touches, and pitter patter of toes are longed for even more. I know my journey in motherhood has just begun, and there is still many more moments of wonder to come, but I just can't get the fact that they are growing too fast, and slipping away too soon out of my mind. As much as I want them to grow, become independent, and experience the world, I want to keep them young, innocent, and mine forever.

Wednesday, August 24, 2011

Cart Surfing

We are shopping for some new fabric, I place the bolts in the back of the cart, and immediately this little kidlet is turned around STANDING!!

Are you kidding me? What happened to my baby?


By the way, there were no straps on this cart, and I didn't think I needed them! Yikes! Guess I do now!

Household Item = Butterfly Art

Have you ever looked around your home and wondered how you could incorporate an everyday household item just lying around into your kidlets art project? Well...your in luck, because I happened to do just that. 

In the last year or so, Daddy-O has taken up drinking coffee. He dusted off the coffee pot that was hiding way up in the top cabinet, which was only used once or twice a year when Nana Kim came to visit, and he put it to use for a few weeks. Then, our new found coffee drinker decided he was in need of a Keurig. He chucked the old pot system away, leaving the filters behind. Everyday I opened the cabinet, these white little filters were staring me in the face. 

Then, it hit me...ART...BUTTERFLIES...FUN!!!

For this project all you need is old coffee filters, watercolor paints, and black pipe cleaners. 


Spread the coffee filter out on a plate or piece of newspaper. 


Open the watercolors, and hand the brush to your little darling.


Let your kidlet use their imagination, and do their magic!


Once the coffee filter dries, take the pipe cleaner, fold it in half around the coffee filter and twist. Presto, a new butterfly is born! 

This little craft is quick to set up, simple and fun to do, ridiculously easy to clean up, and cute when finished. You can use these little beauties to decorate your child's room or as a fun toy for them to play with. 

LinkWithin

Related Posts Plugin for WordPress, Blogger...